Latest Releases

Showing posts with label cisco. Show all posts

Gns3 lab: Configure dhcp on cisco router

CONFIGURE DHCP ON CISCO ROUTER


DESCRIPTION 

[+] In this tutorial we learn how to configure the DHCP to create a small testing lab.
[+] First we create a network using one router and virtual machine.
[+] Second we configure the interface f0/0, see this post:
link: http://networkingdna.blogspot.in/2015/06/configure-telnet-on-cisco-router.html
[+] Third we configure the dhcp pool.
[+] Fourth from the Linux machine, we check the connectivity between linux machine and router.
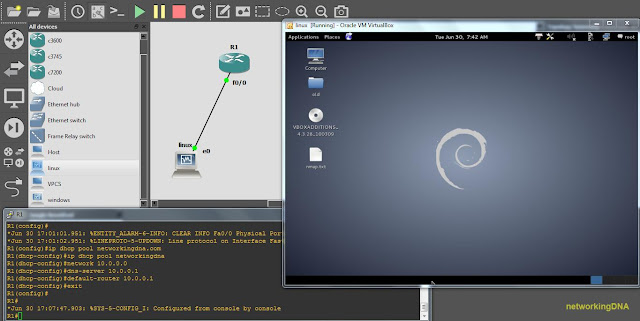
[+] Below is the lab setup image.


HOW TO CONFIGURE DHCP 

STEPS

R1(dhcp-config)#ip dhcp pool networkingdna
R1(dhcp-config)#network 10.0.0.0
R1(dhcp-config)#dns-server 10.0.0.1
R1(dhcp-config)#default-router 10.0.0.1
R1(dhcp-config)#exit

Below is the image for more help-

ENABLE DHCP SERVICE 

Usually DHCP service is enabled by default. But in case if you want to start and stop  DHCP service you can use this command.

To Enable DHCP
R1(dhcp-config)#service dhcp

To Disable DHCP 
R1(dhcp-config)#no service dhcp

ON LINUX MACHINE 
  • Observe DHCP automatically assigned the ip address to the linux machine.
  • To verfiy the connectivity we ping the router address.
  • See the below image for more details: 

AT THE END 
  • This tutorial will help to make a lab in a easy way to test your router. These are basic tutorial but very useful in different scenarios.
  • Keep following us, we come up soon with more interesting tutorials.
  • You can connect us with this link: https://www.facebook.com/networkingdna

THIS TUTORIAL IS JUST FOR EDUCATIONAL PURPOSES ONLY/-

Read »

Configure Telnet On Cisco Router


CONFIGURE TELNET ON CISCO ROUTER 


Description

In this tutorial,we will learn how to configure the line vty line. Tutorial covers few points such as:

[+] Create a network on GNS3
[+] Configure IP address on router.
[+] Configure line vty line.
[+] Run nmap command to see the open ports.
[+] Access router through telnet command from the linux machine.

This is a basic tutorial to learn how to configure a small lab for testing purposes. Its up to you what else you can do with it.
Also make sure that their should be proper connectivity between the router and linux machine.

DEVICE INFORMATION 

Details: 

GNS3: Latest version GNS 1.3.7
Virtual Box: 4.3.28
Router:  7200 series IOS Image
Operating System: Linux (Kali Linux)

CREATE A NETWORK IN GNS3

  • To create a network, we have used 1 router and 1 linux virtual machine.
  • Network is of class A address i.e 10.0.0.0
  • You can see the below image for more help:


CONFIGURE IP ADDRESS ON ROUTER 
  • To configure ip address, follow the below command given below or shown in the below image.
  • See the below image to configure the fast interface 0/0.


Commands

R1#config t
R1(config)#int f0/0
R1(config-if)#ip address 10.0.0.1 255.0.0.0
R1(config-if)#no shut
R1(config-if)#exit
R1(config)#

CONFIGURE LINE VTY 


Commands

R1#
R1#config t
R1(config)#line vty 0 4
R1(config-line)#password 12345
R1(config-line)#login
R1(config-line)#exit
R1(config)#enable secret cisco123
R1(config)#

WHAT HAPPEN WHEN WE CONFIGURE LINE VTY 
  • When we configure line vty we started telnet service on port 23.
  • You can check this using nmap tool as shown in the below image.
  • In the below image, observe that port 23 is open when we configure line vty.

ACCESS TELNET THROUGH LINUX MACHINE 

  • Now through the linux machine get access to the router using telnet command.
  • See the below image for more help.
  • Command: telnet <router ip>

AT THE END 
  • This tutorial is just for beginners who wants to setup a basic lab in their laptop.
  • Keep following the we are coming with more tutorials that help you in penetration testing.
  • You can join us on facebook. Here is the link to connect: https://www.facebook.com/hackingDNA

THIS TUTORIAL IS JUST FOR EDUCATIONAL PURPOSES ONLY/-

Read »

Welcome To NetworkingDNA

About Us 

NetworkingDNA

Our Mission is to create a knowledge bases of different technologies . 

Technologies Used 

GNS3 is an open source software that simulate complex networks while being as close as possible to the way real networks perform. All of this without having dedicated network hardware such as routers and switches.


VMware Workstation
VMware Workstation is the most advanced virtualization software for desktop and laptop computers. The VMware Workstation 10 release further strengthens the product’s leadership in providing the broadest, deepest OS support (including Windows 8.1), best-in-class virtual machine architecture, the richest desktop user experience and an unmatched set of value-added features to enhance the productivity of technical professionals and the organizations they serve.


Wireshark 
is the world's foremost network protocol analyzer. It lets you see what's happening on your network at a microscopic level. It is the de facto (and often de jure) standard across many industries and educational institutions.
Wireshark development thrives thanks to the contributions of networking experts across the globe. It is the continuation of a project that started in 1998.

Cisco Packet Tracer


 Cisco Packet Tracer is a powerful network simulation program that allows students to experiment with network behavior and ask “what if” questions. As an integral part of the Networking Academy comprehensive learning experience, Packet Tracer provides simulation, visualization, authoring, assessment, and collaboration capabilities and facilitates the teaching and learning of complex technology concepts.

Read »

Ads

Copyright © 2015 NetworkingDNA

Designed by Templatezy | Distributed By Gooyaabi Templates